I’ve conquered Angels Landing three times, and here’s what you absolutely need to know: secure your permit through the NPS lottery system months ahead, arrive at The Grotto before 9 AM to avoid parking nightmares, and pack gloves for the chain section plus extra water—this 5.4-mile trail with 1,488 feet of elevation gain isn’t forgiving. The final half-mile features 1,000-foot drop-offs that’ll test your nerve, so respect the weather conditions and your limits for a successful summit.
Securing Your Permit and Planning Ahead
Before you can tackle the famous chain section of Angels Landing, you’ll need to secure a permit through the National Park Service’s mandatory lottery system. I can’t stress enough how essential your permit application timing is! The lottery process operates through Recreation.gov with two options: seasonal lotteries (1-3 months ahead) and day-before lotteries for last-minute opportunities. You’ll pay a $6 non-refundable application fee plus $3 per person if selected. Here’s my top tip: create your Recreation.gov account early and use the ranked choice system strategically by listing multiple preferred dates and times. Remember that multiple entries can increase your chances of securing a permit for your desired hiking date.
Getting to The Grotto Trailhead
Once you’ve secured your permit, I’ll walk you through the essential steps to reach The Grotto Trailhead efficiently. You’ll need to navigate Zion’s shuttle system, plan your timing around parking challenges, and familiarize yourself with the facilities available at the trailhead. The trailhead is conveniently located at Shuttle Stop 6, making it easily accessible via the park’s transportation system. Let me break down these vital logistics so you can focus on the incredible hike ahead!
Shuttle System Navigation
Everyone heading to Angels Landing must navigate Zion’s shuttle system to reach the Grotto trailhead—and it’s actually pretty straightforward! I’ll help you master the basics quickly.
The shuttle runs February through November with no reservations needed. You’ll board at the Visitor Center and ride to Stop #6—that’s Grotto. Listen for the driver’s announcement!
Practice good shuttle stop etiquette by letting others exit first. Maintain shuttle capacity awareness during morning rush hours when shuttles fill quickly. Pro tip: shuttles run every 15 minutes during peak times, so don’t stress if you miss one. The ride offers stunning canyon views! The travel time from the visitor center to the final stop at Temple of Sinawava is approximately 40 minutes, so plan accordingly for your Angels Landing departure time.
Parking and Timing
Getting to the Grotto trailhead requires some strategic planning around Zion’s parking situation—and trust me, it can get intense during peak season! Here are my proven parking strategies and timing tips for success.
| Time Period | Parking Location | Access Method | Difficulty Level | Pro Tips |
|---|---|---|---|---|
| Peak Season (Mar-Nov) | Visitor Center | Shuttle Required | High | Arrive before 9 AM |
| Peak Season Backup | Springdale | Town Shuttle | Medium | Use overflow lots |
| Winter (Dec-Feb) | The Grotto | Direct Drive | Low | Check road conditions |
| Early Morning | Springdale | Walk/Bike | Medium | Beat shuttle schedule |
| Backup Plan | Human History Museum | Park Shuttle | Medium | Secondary option |
Parking fills rapidly after 9 a.m., especially during summer! Remember that the shuttle service doesn’t operate early enough for sunrise hikes, so you’ll need to walk or bike from your parking location to reach the trailhead if you’re planning an early morning start.
Trailhead Facilities Overview
The Grotto Trailhead sits at shuttle stop #6 in Zion Canyon and serves as your gateway to the famous Angels Landing hike. You’ll find excellent trailhead amenities here, including restrooms and water refill stations – your last chance before the challenging climb ahead! The area features picnic spots under massive cottonwood trees, perfect for final preparations.
I recommend taking advantage of the scenic views of the Virgin River and Angels Landing from this historic location. The Civilian Conservation Corps established this spot as a campground in the 1920s. During peak seasons, the free town shuttles arrive every 7-10 minutes from Springdale to transport visitors to the park entrance. Remember, you’ll need your permit and photo ID before starting your adventure!
What to Expect on the Trail
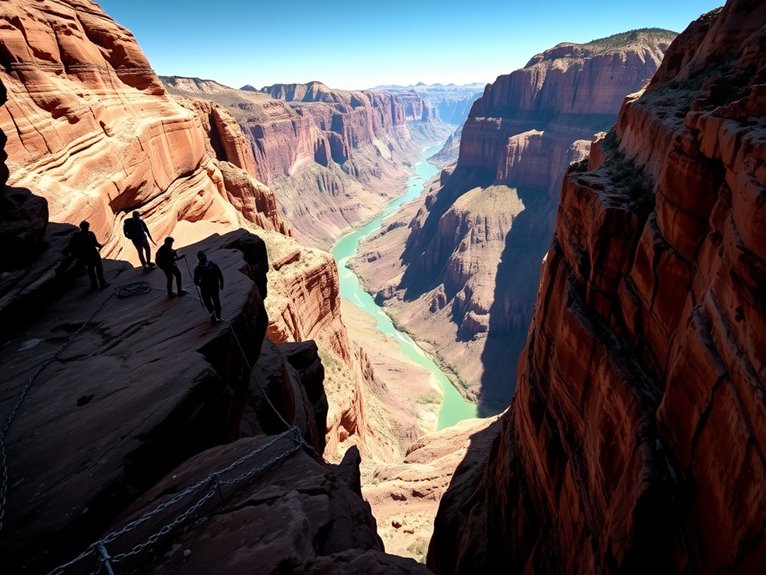
When you step onto Angels Landing’s trail at the Grotto Trailhead, you’re starting one of America’s most thrilling hikes! This 5.4-mile round-trip adventure delivers incredible trail highlights that’ll leave you speechless. You’ll first enjoy Refrigerator Canyon’s cool shade before tackling Walter’s Wiggles—21 steep switchbacks that test your endurance. However, Angels Landing and several other trails are currently experiencing closure due to recent thunderstorm damage. The scenic viewpoints from Scout’s Lookout offer perfect photo opportunities. Then comes the real challenge: Angels Landing’s spine with its narrow pathways and steep drop-offs. You’ll grip chains during the final ascent, but the panoramic views make every challenging step worthwhile. Plan 4-5 hours for this unforgettable experience!
Understanding the Difficulty and Safety Risks
Before you commit to this legendary hike, you need to understand that Angels Landing isn’t your typical weekend trail walk! This 5.4-mile journey packs serious trail challenges with 1,488 feet of elevation gain and terrifying 1,000-foot drop-offs on both sides.
The final half-mile features narrow pathways where you’ll grip chains bolted into rock faces. I can’t stress enough how essential proper safety strategies are here. You’ll need a permit, plenty of water, and solid mental preparation. If you’re afraid of heights or inexperienced, consider stopping at Scout Lookout instead of risking the treacherous final ascent.
Plan to allocate 4 to 6 hours for the complete round trip, as the challenging terrain and crowds can significantly slow your progress along this strenuous route.
Choosing the Right Time to Hike
Why does timing make such a massive difference on Angels Landing? I’ll tell you exactly when to tackle this epic trail!
Seasonal advantages matter big time. Fall (September-November) offers cooler temps and stunning autumn colors. Spring (March-May) brings fewer crowds but possible trail closures from flooding. Summer’s brutal heat requires dawn starts and tons of water. Winter looks gorgeous but ice makes chains deadly dangerous.
Crowd impact changes everything! Peak summer means shoulder-to-shoulder hiking on narrow ledges. That’s terrifying! Spring and fall deliver smaller crowds for safer passage. Consider planning your hike for after 3:00 pm when many visitors start leaving the park.
Always check with park rangers before heading out. Weather conditions change rapidly in Zion!
Essential Gear and Water Requirements
Getting your timing right is only half the battle – having the proper gear could literally save your life on those exposed cliffs! I recommend sturdy hiking boots and moisture-wicking clothes as your foundation. Pack 2-3 liters of water using reliable hydration methods like Camelbaks or bottles with electrolyte supplements.
Don’t forget essential snacks – energy bars, nuts, and dried fruits keep you fueled. Bring gloves for the chain section, sunscreen, and a first aid kit. Keep your backpack small and snug to avoid balance issues on the narrow cliff sections of the trail. A headlamp’s vital if your hike runs late. Most importantly, secure your permit beforehand! This gear list isn’t optional – it’s your lifeline.
Navigating the Famous Chain Section
After Scout Lookout, you’ll face the most thrilling and dangerous part of your Angels Landing adventure – the infamous chain section! This narrow, exposed path demands careful chain use as your lifeline along steep drop-offs. I can’t stress enough how essential proper foot placement becomes here.
The chain section represents Angels Landing’s ultimate test – where proper technique and respect for exposure separate successful hikers from potential tragedy.
Key Navigation Tips:
- Grip chains firmly but don’t over-rely on them
- Move at a steady, controlled pace
- Communicate clearly with other hikers
Group dynamics matter tremendously in this two-way traffic situation. Stay aware of your team’s comfort levels and physical capabilities. Weather conditions can shut down access instantly, so respect all safety restrictions! Always maintain three points of contact with the rock face and chains for maximum stability and safety.
Weather Considerations and Trail Conditions
Weather can make or break your Angels Landing adventure faster than you’d expect! I’ve seen perfect hiking days turn dangerous within hours.
Temperature impacts your safety greatly. Summer temps exceed 100°F, making trail surfaces scorching hot. You’ll need tons of water and sun protection. Spring and fall offer ideal 60-80°F conditions.
Precipitation hazards are serious business here. Monsoon thunderstorms create flash flood risks, especially July through September. Rain makes chains slippery and deadly.
I always check weather forecasts obsessively and start early morning hikes. Wind gusts can destabilize you near cliffs. Trail conditions change rapidly after storms, creating muddy, treacherous surfaces. Current forecasts show mostly dry conditions with temperatures reaching up to 29°C, making it ideal for planning your hike.
Frequently Asked Questions
Can I Camp Overnight on Angels Landing or Anywhere Along the Trail?
Like Moses wandering the wilderness, you can’t pitch your tent on Angels Landing itself! I must tell you that camping regulations strictly prohibit overnight stays directly on the trail or summit. Trail safety concerns and fragile ecosystems drive these rules. You’ll need to stay at designated campgrounds like Watchman or permitted backcountry sites instead. Violating these camping regulations can result in hefty fines, so plan your basecamp wisely!
Are There Restrooms or Emergency Facilities Available Beyond Scout Lookout?
I need to tell you that restroom locations don’t exist beyond Scout Lookout on Angels Landing Trail. There aren’t any emergency facilities either! You’ll find the last restrooms at Scout Lookout, so use them before continuing. For emergency contacts, call 911, but cell coverage is spotty. No emergency shelters exist on this exposed trail. Water isn’t available either, so stock up below. Plan accordingly and stay safe out there!
What Happens if I Lose My Permit or Forget It at Home?
If you lose your permit or forget it at home, you’re unfortunately out of luck for that day. There aren’t permit retrieval options once you’re at the park – rangers will turn you away without proper documentation. Your best bet? Try the day-before lottery on Recreation.gov for tomorrow’s hike. I always recommend taking photos of your permit as backup and following hiking safety precautions by double-checking essentials before leaving home!
Is There Cell Phone Service on the Trail for Emergencies?
Like a desert mirage, cell coverage on Angels Landing appears and vanishes unpredictably! I can’t stress this enough – don’t count on your phone for emergencies. Reception’s spotty throughout most of the trail, though Verizon users sometimes get lucky at the summit. Before hiking, I’d download emergency contacts and inform someone of your plans. The canyon walls create dead zones where signals disappear completely. Always carry backup navigation tools!
Can I Bring My Drone to Capture Aerial Footage From the Summit?
I can’t recommend bringing your drone to Angels Landing! Drone regulations in Zion National Park strictly prohibit all drone use, including aerial photography. You’ll face serious penalties – up to $5,000 fines and six months imprisonment. Drones disturb wildlife like bighorn sheep and ruin other visitors’ experiences. Instead, I’d suggest using existing aerial footage online or hiring professional photographers with special permits for your memories.

